# 0. 📖 Introduction
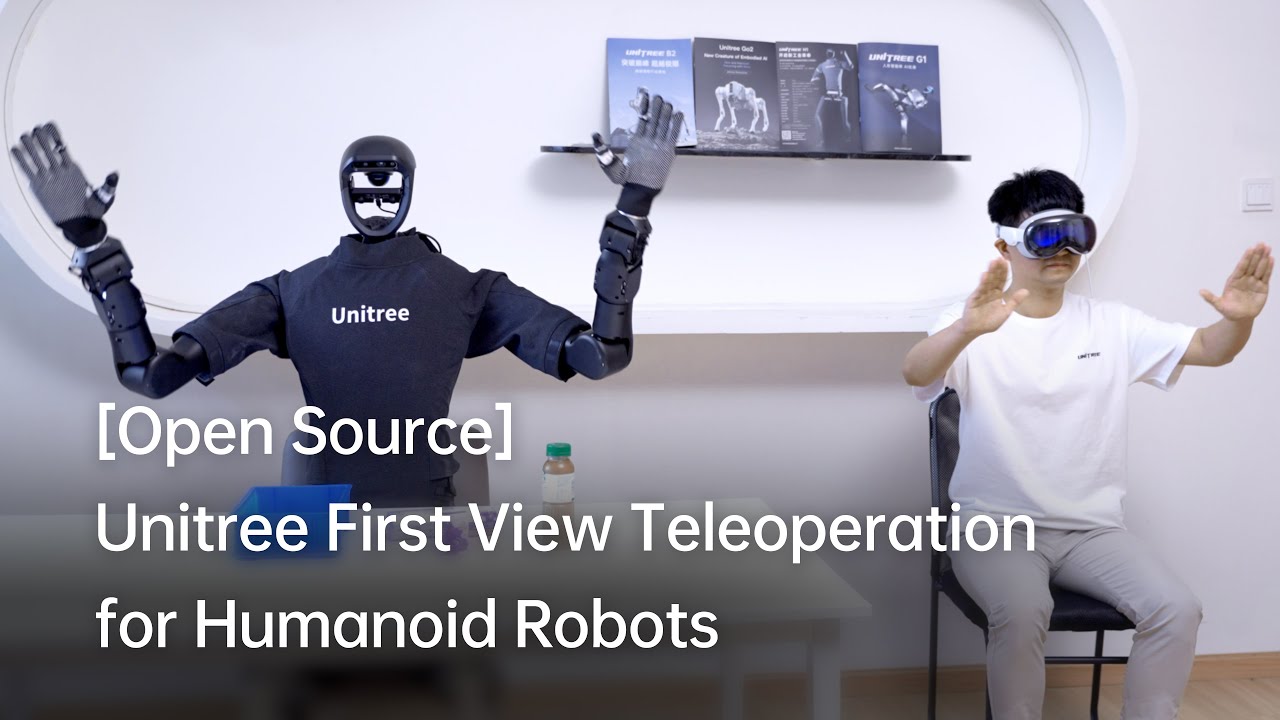
This repository implements teleoperation of the **Unitree humanoid robot** using **Apple Vision Pro**.
Here are the robots that will be supported,
🤖 Robot
⚪ Status
G1 (29DoF) + Dex3-1
✅ Completed
G1 (23DoF)
⏱ In Progress
H1 (Arm 4DoF)
⏱ In Progress
H1_2 (Arm 7DoF) + Inspire
⏱ In Progress
···
···
# 1. 📦 Prerequisites
We tested our code on Ubuntu 20.04 and Ubuntu 22.04, other operating systems may be configured differently.
For more information, you can refer to [Official Documentation ](https://support.unitree.com/home/zh/Teleoperation) and [OpenTeleVision](https://github.com/OpenTeleVision/TeleVision).
## 1.1 🦾 inverse kinematics
```bash
unitree@Host:~$ conda create -n tv python=3.8
unitree@Host:~$ conda activate tv
# If you use `pip install`, Make sure pinocchio version is 3.1.0
(tv) unitree@Host:~$ conda install pinocchio -c conda-forge
(tv) unitree@Host:~$ pip install meshcat
(tv) unitree@Host:~$ pip install casadi
```
> p.s. All identifiers in front of the command are meant for prompting: **Which device and directory the command should be executed on**.
>
In the Ubuntu system's `~/.bashrc` file, the default configuration is: `PS1='${debian_chroot:+($debian_chroot)}\u@\h:\w\$ '`
>
> Taking the command `(tv) unitree@Host:~$ pip install meshcat` as an example:
>
> - `(tv)` Indicates the shell is in the conda environment named `tv`.
>- `unitree@Host:~` Shows the user `\u` `unitree` is logged into the device `\h` `Host`, with the current working directory `\w` as `$HOME`.
> - `$` shows the current shell is Bash (for non-root users).
> - `pip install meshcat` is the command `unitree` wants to execute on `Host`.
>
> You can refer to [Harley Hahn's Guide to Unix and Linux](https://www.harley.com/unix-book/book/chapters/04.html#H) and the [Conda User Guide](https://docs.conda.io/projects/conda/en/latest/user-guide/getting-started.html) to learn more.
## 1.2 🕹️ unitree_sdk2_python
```bash
# Install unitree_sdk2_python.
(tv) unitree@Host:~$ git clone https://github.com/unitreerobotics/unitree_sdk2_python.git
(tv) unitree@Host:~$ cd unitree_sdk2_python
(tv) unitree@Host:~$ pip install -e .
```
# 2. 🛠️ TeleVision and Apple Vision Pro configuration
## 2.1 📥 basic
```bash
(tv) unitree@Host:~$ cd ~
(tv) unitree@Host:~$ git clone https://github.com/unitreerobotics/avp_teleoperate.git
(tv) unitree@Host:~$ cd ~/avp_teleoperate
(tv) unitree@Host:~$ pip install -r requirements.txt
```
## 2.2 🔌 Local streaming
**Apple** does not allow WebXR on non-https connections. To test the application locally, we need to create a self-signed certificate and install it on the client. You need a ubuntu machine and a router. Connect the Apple Vision Pro and the ubuntu **Host machine** to the same router.
1. install mkcert: https://github.com/FiloSottile/mkcert
2. check **Host machine** local ip address:
```bash
(tv) unitree@Host:~/avp_teleoperate$ ifconfig | grep inet
```
Suppose the local ip address of the **Host machine** is `192.168.123.2`
> p.s. You can use `ifconfig` command to check your **Host machine** ip address.
3. create certificate:
```bash
(tv) unitree@Host:~/avp_teleoperate$ mkcert -install && mkcert -cert-file cert.pem -key-file key.pem 192.168.123.2 localhost 127.0.0.1
```
place the generated `cert.pem` and `key.pem` files in `teleop`
```bash
(tv) unitree@Host:~/avp_teleoperate$ cp cert.pem key.pem ~/avp_teleoperate/teleop/
```
4. open firewall on server:
```bash
(tv) unitree@Host:~/avp_teleoperate$ sudo ufw allow 8012
```
5. install ca-certificates on Apple Vision Pro:
```bash
(tv) unitree@Host:~/avp_teleoperate$ mkcert -CAROOT
```
Copy the `rootCA.pem` via AirDrop to Apple Vision Pro and install it.
Settings > General > About > Certificate Trust Settings. Under "Enable full trust for root certificates", turn on trust for the certificate.
Settings > Apps > Safari > Advanced > Feature Flags > Enable WebXR Related Features.
## 2.3 🔎 Test environment
This step is to verify that the environment is installed correctly.
1. Download Isaac Gym: https://developer.nvidia.com/isaac-gym/download
Extracting to the current directory, go to the `IsaacGym_Preview_4_Package/isaacgym/python` directory and execute the command:
```bash
(tv) unitree@Host:~/IsaacGym_Preview_4_Package/isaacgym/python$ pip install -e .
```
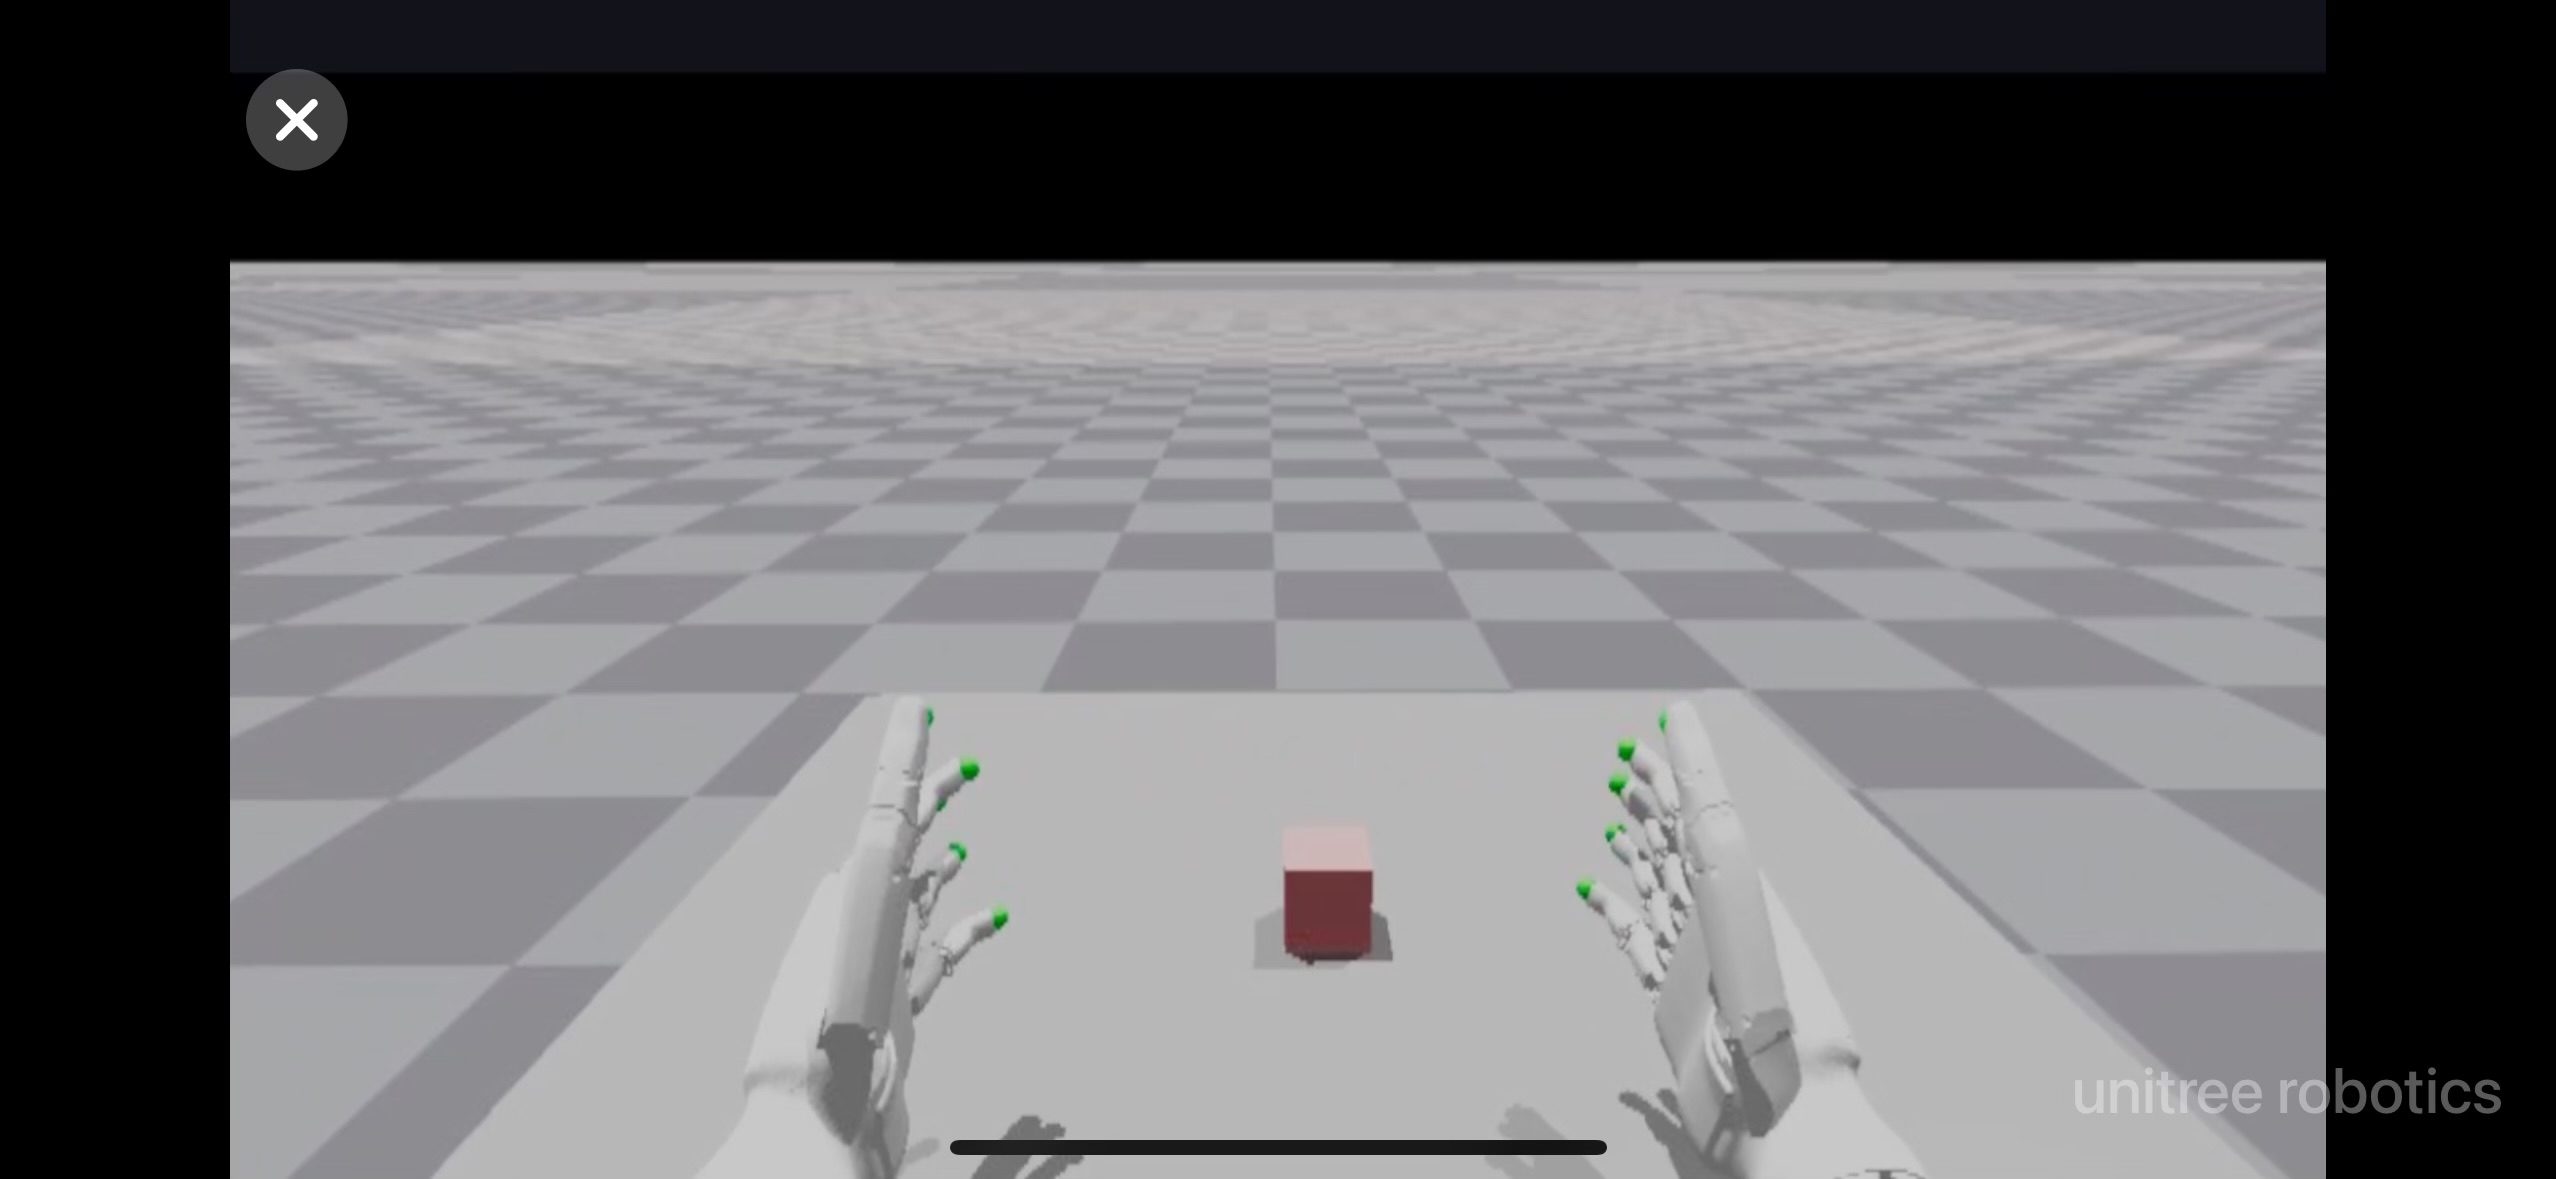
2. After setup up streaming with local following the above instructions, you can try teleoperating two robot hands in Issac Gym:
```bash
(tv) unitree@Host:~/avp_teleoperate$ cd teleop
(tv) unitree@Host:~/avp_teleoperate/teleop$ python teleop_test_gym.py
```
3. Wear your Apple Vision Pro device.
4. Open Safari on Apple Vision Pro and visit: https://192.168.123.2:8012?ws=wss://192.168.123.2:8012
> p.s. This IP address should match the IP address of your **Host machine**.
5. Click `Enter VR` and `Allow` to start the VR session.
6. See your hands in 3D!
# 3. 🚀 Usage
Please read the [Official Documentation ](https://support.unitree.com/home/zh/Teleoperation) at least once before starting this program.
## 3.1 🖼️ Image Server
Copy `image_server.py` in the `avp_teleoperate/teleop/image_server` directory to the **Development Computing Unit PC2** of Unitree Robot (G1/H1/H1_2/etc.), and execute the following command **in the PC2**:
```bash
# p.s.1 You can transfer image_server.py to PC2 via the scp command and then use ssh to remotely login to PC2 to execute it.
# p.s.2 The image transfer program is currently configured for binocular rgb cameras.
# Now located in Unitree Robot PC2 terminal
unitree@PC2:~/image_server$ python image_server.py
# You can see the terminal output as follows:
# Image server has started, waiting for client connections...
# Image Resolution: width is 640, height is 480
```
After image service is started, you can use `image_client.py` **in the Host** terminal to test whether the communication is successful:
```bash
(tv) unitree@Host:~/avp_teleoperate/teleop/image_server$ python image_client.py
```
## 3.2 ✋ Inspire hands Server (optional)
> Note: If the selected robot configuration does not use the Inspire dexterous hand, please ignore this section.
You can refer to [Dexterous Hand Development](https://support.unitree.com/home/zh/H1_developer/Dexterous_hand) to configure related environments and compile control programs. First, use [this URL](https://oss-global-cdn.unitree.com/static/0a8335f7498548d28412c31ea047d4be.zip) to download the dexterous hand control interface program. Copy it to **PC2** of Unitree robots.
On Unitree robot's **PC2**, execute command:
```bash
unitree@PC2:~$ sudo apt install libboost-all-dev libspdlog-dev
# Build project
unitree@PC2:~$ cd h1_inspire_service & mkdir build & cd build
unitree@PC2:~/h1_inspire_service/build$ cmake .. -DCMAKE_BUILD_TYPE=Release
unitree@PC2:~/h1_inspire_service/build$ make
# Terminal 1. Run h1 inspire hand service
unitree@PC2:~/h1_inspire_service/build$ sudo ./inspire_hand -s /dev/ttyUSB0
# Terminal 2. Run example
unitree@PC2:~/h1_inspire_service/build$ ./h1_hand_example
```
If two hands open and close continuously, it indicates success. Once successful, close the `./h1_hand_example` program in Terminal 2.
## 3.3 🚀 Start
> 
>
> 1. Everyone must keep a safe distance from the robot to prevent any potential danger!
>
> 2. Please make sure to read the [Official Documentation](https://support.unitree.com/home/zh/Teleoperation) at least once before running this program.
>
> 3. Always make sure that the robot has entered [debug mode (L2+R2)](https://support.unitree.com/home/zh/H1_developer/Remote_control) to stop the motion control program, this will avoid potential command conflict problems.
>
It's best to have two operators to run this program, referred to as **Operator A** and **Operator B**.
Now, **Operator B** execute the following command on **Host machine** :
```bash
(tv) unitree@Host:~/avp_teleoperate/teleop$ python teleop_hand_and_arm.py --record
```
And then, **Operator A**
1. Wear your Apple Vision Pro device.
2. Open Safari on Apple Vision Pro and visit : https://192.168.123.2:8012?ws=wss://192.168.123.2:8012
> p.s. This IP address should match the IP address of your **Host machine**.
3. Click `Enter VR` and `Allow` to start the VR session.
When host terminal outputs "Please enter the start signal (enter 'r' to start the subsequent program):", **Operator B** can start teleoperation program by pressing the **r** key in the terminal.
At this time, **Operator A** can remotely control the robot's arms and dexterous hands.
Next, **Operator B** can press **s** key to begin recording data in the 'record image' window that opens, and press **s** again to stop. This can be repeated as necessary.
> p.s. Recorded data is stored in `avp_teleoperate/teleop/data` by default, with usage instructions at this repo: [unitree_IL_lerobot](https://github.com/unitreerobotics/unitree_IL_lerobot/tree/main?tab=readme-ov-file#data-collection-and-conversion).
## 3.4 🔚 Exit
To exit the program, **Operator B** can press the **q** key in the 'record image' window.
> 
>
> To avoid damaging the robot, it's best to ensure that **Operator A** positions the robot's arms in a naturally lowered or appropriate position before **Operator B** presses **q** to exit.
# 4. 🗺️ Codebase Tutorial
```
avp_teleoperate/
│
├── assets [Storage of robot URDF-related files]
│
├── teleop
│ ├── image_server
│ │ ├── image_client.py [Used to receive image data from the robot image server]
│ │ ├── image_server.py [Capture images from cameras and send via network (Running on robot's on-board computer)]
│ │
│ ├── open_television
│ │ ├── television.py [Using Vuer to capture wrist and hand data from apple vision pro]
│ │ ├── tv_wrapper.py [Post-processing of captured data]
│ │
│ ├── robot_control
│ │ ├── robot_arm_ik.py [Inverse kinematics of the arm]
│ │ ├── robot_arm.py [Control dual arm joints and lock the others]
│ │ ├── robot_hand_inspire.py [Control inspire hand joints]
│ │ ├── robot_hand_unitree.py [Control unitree hand joints]
│ │
│ ├── utils
│ │ ├── episode_writer.py [Used to record data for imitation learning]
│ │ ├── mat_tool.py [Some small math tools]
│ │ ├── weighted_moving_filter.py [For filtering joint data]
│ │
│ │──teleop_hand_and_arm.py [Startup execution code for teleoperation]
| |——teleop_test_gym.py [Can be used to verify that the environment is installed correctly]
```
# 5. 🙏 Acknowledgement
This code builds upon following open-source code-bases. Please visit the URLs to see the respective LICENSES:
1) https://github.com/OpenTeleVision/TeleVision
2) https://github.com/dexsuite/dex-retargeting
3) https://github.com/vuer-ai/vuer
4) https://github.com/stack-of-tasks/pinocchio
5) https://github.com/casadi/casadi
6) https://github.com/meshcat-dev/meshcat-python
7) https://github.com/zeromq/pyzmq
8) https://github.com/unitreerobotics/unitree_dds_wrapper
9) https://github.com/tonyzhaozh/act
10) https://github.com/facebookresearch/detr
11) https://github.com/Dingry/BunnyVisionPro